Tuesday, February 26, 2013

Building My Bike: #7 Brakes, Derailleurs, and Chain

Front too close.
Rear too close.
What could be so hard about brakes? Take them off the old bike, put them on the new frame, put new brake pads on. Done, right? The problem was that both brakes didn't fit on the new frame. Huh? I've never heard of brakes not fitting but they didn't fit. The rear brake pads were right up against the seat stays and the front brake pads were right up against the fork. Mild panic because I didn't want to buy new brakes. Did some reading. Didn't find anything. Okay, if this isn't a problem that's documented then it isn't a problem, right? If you look at where the brake contacts where it's going, there's this thick washer. Perhaps I just needed another thick washer.
Front with washers.
Rear with washers.
Well, I couldn't find any at the hardware store or the LBS ("I must throw out ten of those a week." Sigh.) so I improvised. I decided to use regular washers and stack them until the pads cleared their obstruction. It took three washers for each brake but it worked. Now, I'm not convinced that regular washers are the best thing to use. They are smooth and the thick washer that was with the brakes is serrated, likely to keep it from turning when force is applied to the brakes. I looked and I looked and I finally found that JensonUSA stocks serrated washers so when I next place an order from them, I will include some of these.

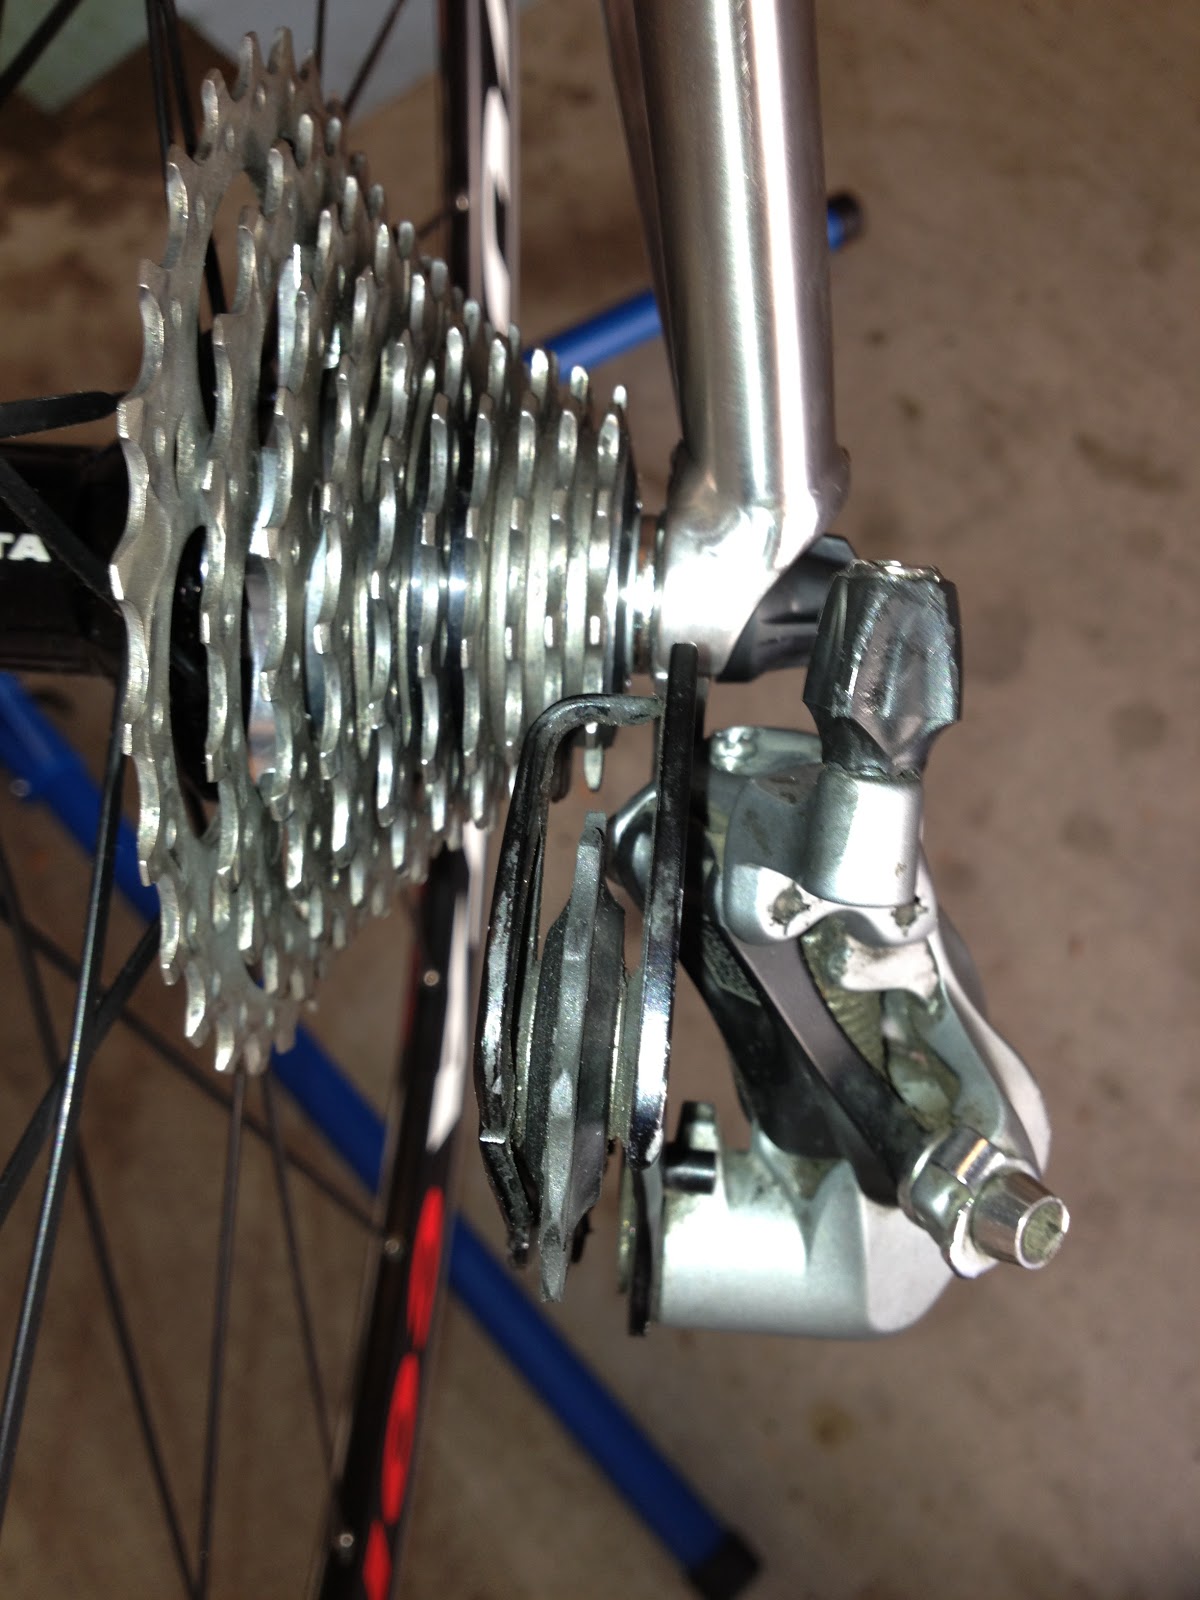
Derailleurs proved to be a bit easier. Hanging the front derailleur was pretty straightforward: put it a few millimeters above the big chainring. The rear derailleur was a bit more interesting. Putting it on was no problem but I noticed this adjusting screw that I hadn't seen before (because you don't really see it until you're looking at the derailleur from the inside). It is the B-adjustment screw and it is used to, in a nutshell, keep the cage from rubbing up against the cassette (learn all about rear derailleur adjustments from Sheldon Brown). That would have to wait until I put the chain on.

As for the chain, I could have gone with the usual Shimano Ultegra chain but I decided to give the KMC X10.93 chain a try. It was almost half the cost of the Shimano and it got great reviews. Sold. The instructions in the FLO Cycling guide I have been using say to wrap your chain around the big chainring and the biggest cog, add two links (one if you have a master link, which the KMC has) and that is the length of your chain. I was a bit skeptical but I checked other sources and they had the same advice. Worked great. I was surprised when all that fit in the rear derailleur but it did.

Now that the chain was installed, I could go back and work on that B-adjustment screw. The FLO Cycling video that accompanies the guide for this shows the top-most pulley always quite a distance from the cassette. Hmm. My top-most pulley only gets that way when it is pulled down a bit by the chain. Hmm. Well, I'm not convinced I have totally set this correctly but it is working for now. I'll probably have to revisit this.

That was the easy part of setting up the derailleurs. The real adjustments happen after I attach the cables.

Saturday, February 23, 2013

Building My Bike: #6 Wheels and Tires

The crash wrecked my wheels. There weren't taco-d but they were so messed up that I needed to get new ones. I liked the Vuelta wheels that came on my old bike. A little aero, bladed spokes, and demonstrably bomb-proof. I wanted to see what else was out there, though.

The first set that caught my eye was the Mavic Cosmic Elite. Very similar to the Vueltas feature-wise. They were right on the upper edge of what I wanted to spend but they were tough to find on sale and in stock. I did find a good source for them, though: eBay. Seems that they are the standard wheels on some bikes but people want to upgarde to better wheels so they put their Cosmic Elites on sale. I got close in a few auctions but then I started wondering whether I really wanted to spend $400 on wheels. I decided to find another set.

Next up was the Reynolds Shadow. Spokes aren't bladed but the price was right. However, they were really hard to find in-stock in online stores (some stores say they've been discontinued). I also had a question about how bomb-proof they were, since there wasn't much in the way of reviews to check out. See, light, fast, and expensive wheels are made for whippet riders. Us bigger folks need heavier wheels that won't crumple when we bunny-hop over potholes.

In the end, I decided to go with what I knew: Vueltas. The Vuelta Corsa Pro, to be specific. I already knew that Vueltas could handle my load. They are 30mm deep and have bladed spokes. Clinchers, of course. And the price at JensonUSA was right. Sold.

Tires wasn't much of a decision but I did decide to go with something slightly new. My go-to tires are Vittoria Rubino Pros. I have tried tires by Continental, Specialized, Vredstein, and Michelin but I keep coming back to Vittoria. They wear well, hold up against punctures better than the others, feel good (really, some tires just don't feel good from the first few pedal strokes) and I can run them at high pressure (120psi rear, 110 front). However, instead of the typical 23mm tires, I wanted to try 25mm tires. More grip on the road and a supposedly smoother ride. We'll see.

I should mention rim tape. Because I use such high pressure in my tires, I can't use regular rim tape. Did you know that? Neither did I until I did some rides with the higher pressure and I got a flat going downhill on the inside of the tube. I did some reading and found that because of the high pressure, regular rim tape can fail, allowing the tube to expand in the spoke holes and flat. I now buy Vittoria High Pressure Rim Tape (up to 145psi) and put that on my rims.

Thursday, February 21, 2013

Building My Bike: #5 Bottom Bracket, Crankset and Cassette

I had hoped to move the drivetrain from my old bicycle to the new frame and I did, for the most part. Taking the crankset off was straightforward. I had never taken a cassette off a wheel, so that was new but wasn't too hard. A helpful tip: cassettes come off one cog-at-a-time (for the most part) and there are spacers between some of them so take pictures of the pieces that come off in the order that you took them off. It will really help you putting things back together.

When it came time to remove the bottom bracket, I found I had two problems. First, I had the wrong tool because I thought I had a BB with external cups. Yeah, that's a stupid thing to not notice but, in my defense, my old bike originally came with one but that changed when I switched to a compact crankset, so I'm not completely hallucinatory. The second problem was that when I turned the bottom bracket, it felt a bit rough so I figured it needed replacing. I decided to let get a new bottom bracket and at the LBS and let them install it. I'm not convinced that was the most cost-effective decision but I didn't want to buy yet another tool and was anxious to get this done. Oh well, they put it on and it is smooth as silk.

Putting the crankset on the new bike was, of course, a piece of cake.

Before I put the cassette on the new wheel, I wanted to clean it. All I did was mix up some water with degreaser and soak the cogs in there while I did other work on the bike. After an hour or two I took them out, wiped them off with a shop towel, and put them on the rear hub. While they don't exactly look new, it is a huge improvement over how they looked before.

Oh, and while I was down there, I added the bottom bracket cable guide. That's something you don't usually think about, do you? Not only does your LBS probably not stock them, they are kind of a neglected part out there on the internet. Your best bet is to find them on eBay. The problem is that there are different sizes of cable guides because of the different sizes of bottom brackets and you don't always get a description of the BB size for your cable guide. The guide from my old bike didn't fit so, originally, I bought a Campagnolo cable guide on eBay because I thought it would be funny ("Find the Campy part I used."). It turns out that it was made for a bigger BB so I couldn't use it, either (though I did try and ended up stripping the cheap screw in the process--I had to break the cable guide and used pliers to remove the screw). Stopped at the LBS, they had a couple different types laying around so I got both. The ugly one fit best. Oh well, nobody will see it but me.

Update 3/2/13: Competitive Cyclist just posted a gallery of their new Merlin Extralight titanium bike. Look at the bottom bracket cable guide! Looks like I'm in good company.

Tuesday, February 19, 2013

Building My Bike: #4 Headset and Fork

The headset. It doesn't do so much. It connects the fork's steerer tube to the head tube, allowing you to steer the bike. And that's it. So how do you decide what headset to get? I don't have much experience with them but the overwhelming consensus on the internet is that Chris King makes the best headsets. They work well and they last. Sounds good. Headsets don't cost all that much, relatively speaking, and, while a Chris King Nothreadset costs over $100, which is twice what a lower-end headset costs, it's still not the most expensive one out there. A pro-level component for not much over $100? Sold.

I thought getting a fork was going to be much simpler than what it turned out to be. That's because I didn't know as much about forks as I do now. Specifically: fork geometry. See, I thought I could just buy any old carbon fork and it would be good. So I went to Bike Island, which stocks components found on BikesDirect.com bikes, and looked at forks. Something I noticed was this thing called "rake". It differed between different forks. Hmmm. So I did some reading on the internet about forks, which lead to another term: "trail". Good thing I did. Because of my frame's head tube angle, the rake found on most forks would not give me the right amount of trail. That article said a trail of 57mm is ideal but that is what my last bike had and I could not ride hands-free for very long so I wanted a bit more trail. I used this handy trail calculator and found that I needed a fork with a rake of between 48 and 50mm to get the trail I wanted (time will tell if it makes much difference). Finding a fork with a trail like that was not much of a problem. For instance, both 3T and ENVE make forks like that. Finding a fork with a trail like that that wasn't over $400 proved to be more of a test. I finally found an online store that had a 3T Funda Pro fork with a 49mm rake (which made my trail 60mm) at a good price. Sold.

Fork (with crown race), headset, and frame. All I needed to do was put them together. It turns out that assembling all that requires specialized tools that is just not worth me purchasing. I dropped everything off at the LBS and the job was done the next day. If you get a headset installed on your frame, check out its orientation. If the headset's logo is aligned (e.g. the logo faces forward), your shop is paying attention to details (mine did). That's a good thing.